In the user documentation we explain how different parties of the supply chain can use the eWastra system. Choose below which actor you are to find out which are the possibilities.
Downloadable written guides geared towards transporters can be found here:
English
Dutch
French
¶ Shipping / Planning
¶ Contacts
On the left hand side, you can go to your contacts.

¶ Create a new contact
- Go to contacts.
- Click the "New" button to create a new contact.
- Next fill the details of your contact.
- Check the checkbox if this contact is a transportcompany.
- Click save to continue.
By entering the Company registration number (VAT number), the form will complete itself automatically.
Your contact should now be created and added to the list.
¶ Check if linked
As an admin you can easily check wheter a contact is linked or not.
You can just go to the contact screen and check if the connection is made or not.
If not you can click the connect button and send an e-mail invite.

If you do not have admin rights, you can check wheter a contact is linked by adding them to a document.
If your contact is not linked, they will not receive their documents.
Please ask your admin to send a connection invite.
- Go to inbox.
- Click the "New" button.
- Add your contact
- If you have established a connection with this company, a green link icon will appear.

¶ Create a Transport Document
e-Documents can be created in multiple ways.
You can create every type of document by using the web application.
Or it is possible to integrate your current system and reuse your existing data.
Your system will then send data to eWastra for automatically generating documents.
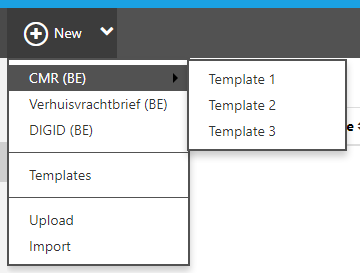
- Click the "New" button to create a new CMR, or click the dropdown menu to select a different type of document.
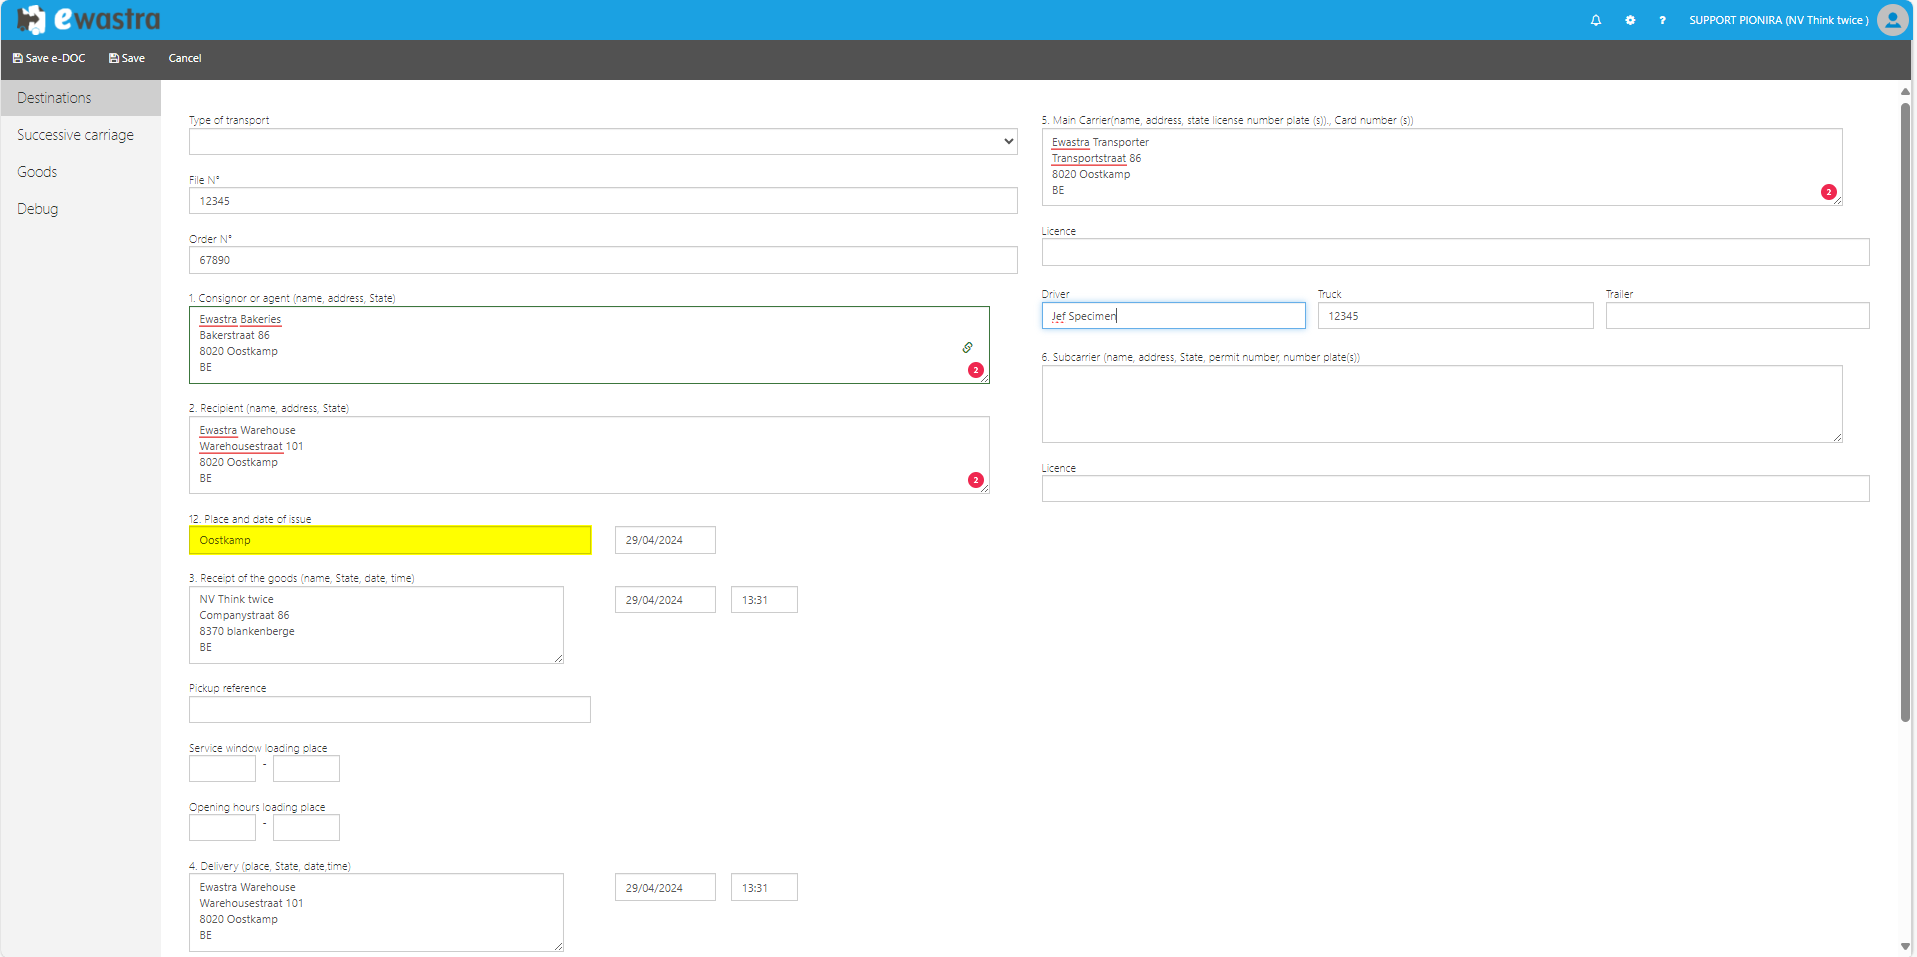
- Fill in all the details
- Destinations information
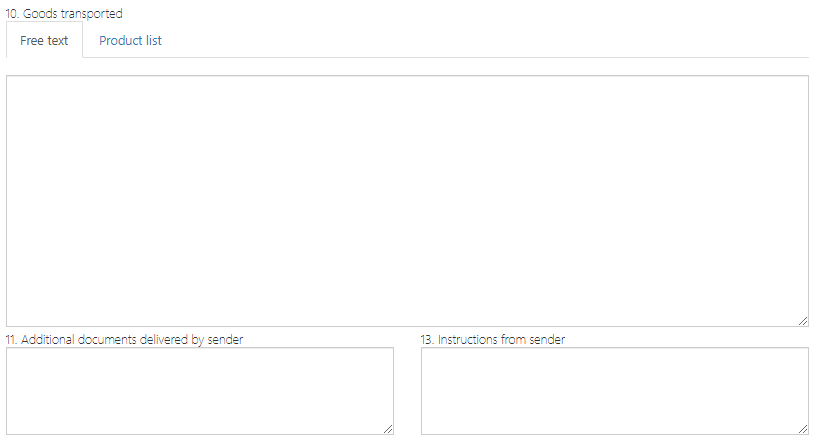
- Fill in the goods information for a cmr document
- Fill in the goods information for a digid (waste) document

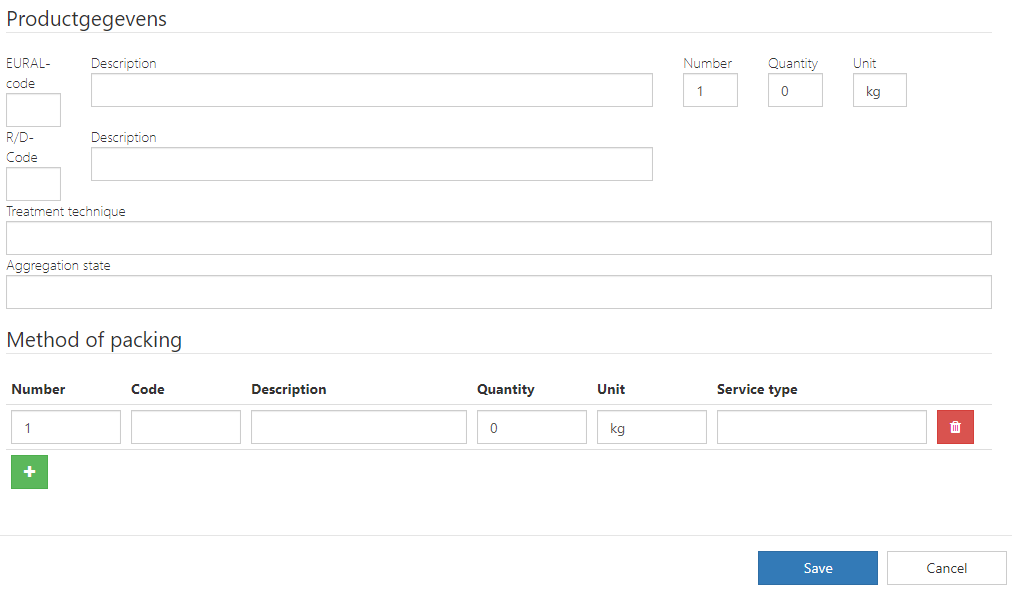
- Add product and packaging information
- You can either click save to save as a draft. Or choose between e-CMR or printed CMR.
(when saved as draft, all other connected parties will be able to see the draft version)
¶ Finalise as e-document
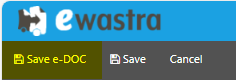
By clicking the "Save e-DOC" button, this document will get the status planned.
From now on your warehouse employee can sign this document digitally.
Finalising as an e-document also means that there won't be any paper documents present.
You can also opt to keep the document in draft. Another party, e.g. the transportcompany will be able to finalise this document for you.
You will see when the transport has been planned and will likely be on its way to you premisses.

¶ The Transportcompany creates the documents
You will see your documents in the "Inbox" menu.
You can edit information, upload attachments, ...
Click "save" to save as a draft.
¶ Consult Document
You can find details of the transportdocument by selecting the desired document.
Next click details, there you will find all the details of the document.

If your are only interested in the documents itself, you can find them in the dropdown menu.

¶ eWastra app
This part of the guide shows the possible ways to sign documents as a consignor.
These documents will be signed digitally. So a digital authograph will be placed on the document.
Before you start with this part of the guide, make sure you have already registered your account.
Also please download the "eWastra" app and log in.
The language of the APP will use the same language as the device. Example, if your language setting of your device is Dutch, the screens in the eWastra app will be shown in Dutch.
You will need to change your device language setting, if you want the eWastra app using that language.
¶ Scan Document of the Driver
To sign a transportdocument, you as a consignor can scan the QR-code of the driver.
Click the scan button in the bottom right corner of the app.
Next, scan the QR-code.
You will see all details of the document you are about to sign.
Make adjustments if necessary.
Tap the sign button to continue.
Verify your details.
Finally, tap sign to sign again to sign the document.
Please find below a demo video.
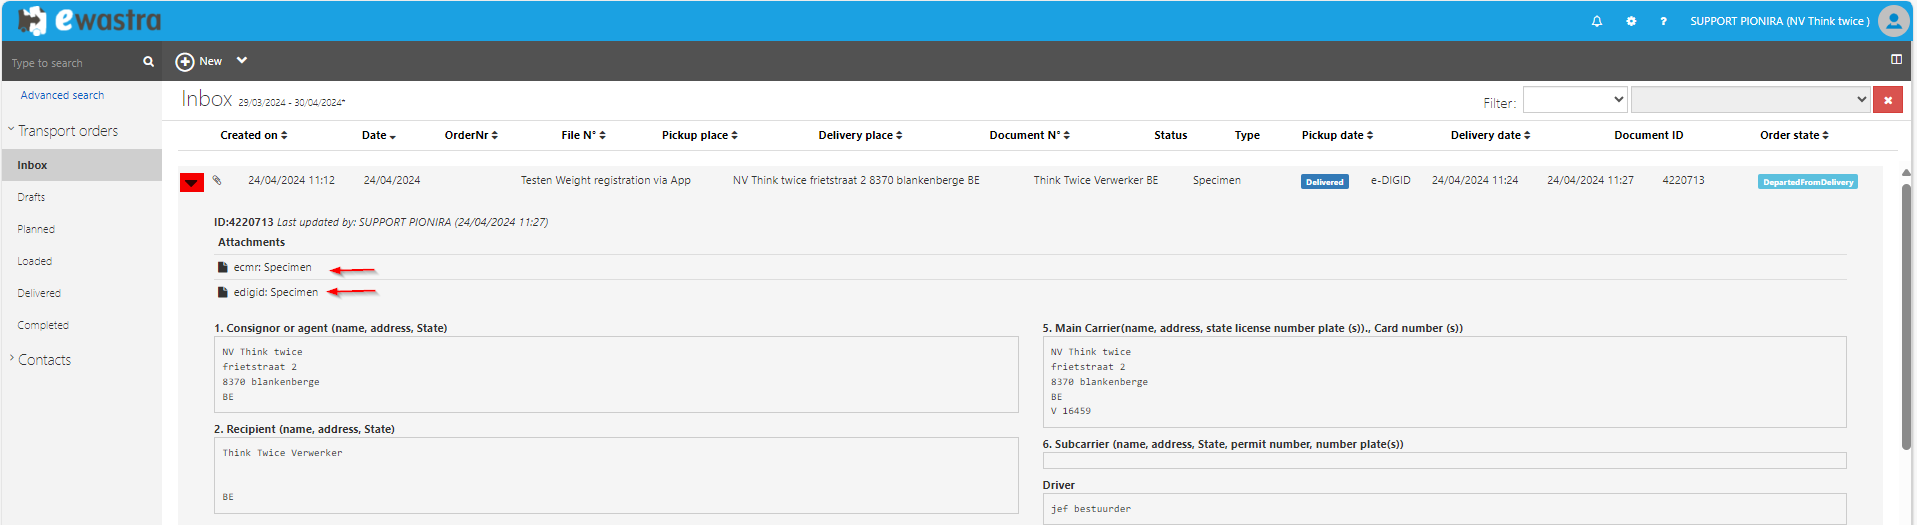
¶ Show Signature code
You can also sign documents using a signature code.
This signature code is unique to your account.
Beware that the QR-code is an equivalent of your autograph.
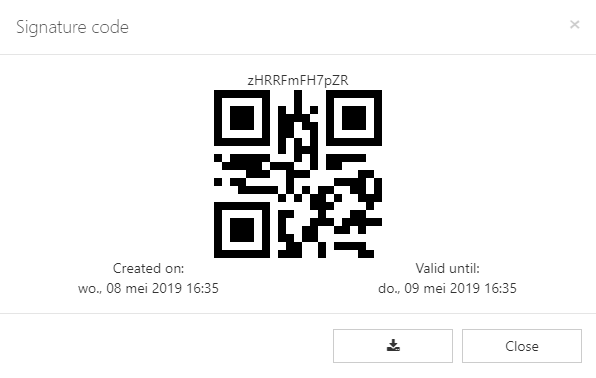
When a driver arrives with digital transport documents.
Just let him scan your signature code.
By scanning this QR-code you have signed the document.
¶ Initiate Signature
The consignor can start the signature process.
He can go to the app and select the desired document.
Make adjustments, fill in missing data.
Next he will sign the document digitally and let the driver sign.
The driver can scan a QR-code, which virtually 'gives' him the document.
Or if the driver is already linked to the document, he can sign it on his device.
In that case a QR-code scan will not be necessary.
Please find an instruction video below.
¶ Double signature and print
People can choose to print the transport documents for the driver.
But the paper version of the consignor will not be printed and will be stored digitally.
First both signatures are placed in the eWastra app.
Next, using the platform or integrated system, you can print a paper version.
If you want to set this up, please contact support@pionira.be.
Only draft and issued CMR's will be available for this flow
¶ Not Connected
If you are consignee, and you did not connect to the platform yet.
You can simply fill in your e-mail adress on the device of the driver.
when you sign for receipt of the goods, all documents will be delivered to you by mail.
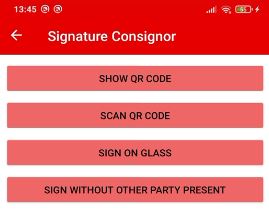
¶ Connected
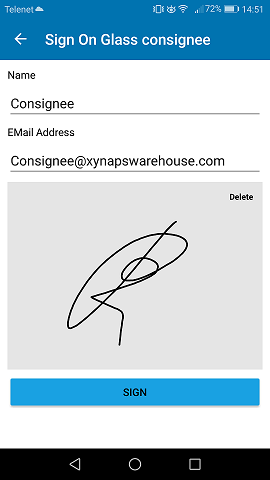
If you are connected to the platform, there are 4 ways to sign the transportdocument.
-
Sign on Glass: This is the most frequently used option. You can sign on the device of the driver and your documents will be sent by mail. But ofcourse you can also find them on the platform.
-
Scan QR-code: You can scan the QR-code using the eWastra app. You will see all the details before you sign.
-
Show signature code: You can generate a signature code. When the driver scans this code, you signed the document.
-
The driver signs in absence of the consignee.
¶ Get signature code
¶ Consult Document
You can find details of the transportdocument by selecting the desired document.
Next click details, there you will find all the details of the document.
If your are only interested in the documents itself, you can find them in the dropdown menu.
¶ Planning
¶ Contacts
On the left-hand side, you can go to your contacts.
¶ Create a new contact
- Go to contacts.
- Click the "New" button to create a new contact.
- Next fill the details of your contact.
- Check the checkbox if this contact is a transport company.
- Click save to continue.
By entering the Company registration number (VAT number) if found in the VIES database, the form will complete itself automatically.
Your contact should now be created and added to the list.
¶ Check if linked
As an admin you can easily check whether a contact is linked or not.
You can just go to the contact screen and check if the connection is made or not.
If not, you can click the connect button and send an e-mail invite.

If you do not have admin rights, you can check whether a contact is linked by adding them to a document.
If your contact is not linked, they will not receive their documents.
Please ask your admin to send a connection invite.
- Go to inbox.
- Click the "New" button.
- Add your contact
- If you have established a connection with this company, a green link icon will appear.

¶ Create a Transport Document
e-Documents can be created in multiple ways.
You can create every type of document by using the web application.
Or it is possible to integrate your current system and reuse your existing data.
Your system will then send data to eWastra for automatically generating documents.
- Click the "New" button to create a new CMR or click the dropdown menu to select a different type of document.
- Fill in all the details
- Destinations information

- Fill in the goods information for a cmr document
- You can either click save to save as a draft. Or choose between e-CMR or printed CMR.
(when saved as draft, all other connected parties will be able to see the draft version)
¶ Finalise as e-document
By clicking the "Save e-Doc" button, this document will get the status planned.
The transport document will now be sent to the device of your driver.
Finalising as an e-document also means that there won't be any paper documents present.
You can also opt to keep the document in draft. Another party can still edit details on this document.
As long as it has a draft status, your driver won't take notice of this order.
Once you finalise this document, it will get the status planned.
For your driver to receive the order, make sure you assign him to the transport document.
You can assign your driver by selecting a document, next click the "assign driver" button.
Fill in the name of the driver and save.

¶ Consult Document
You can find details of the transport document by selecting the desired document.
Next click details, there you will find all the details of the document.
If you're only interested in the documents itself, you can find them in the dropdown menu.
¶ Driver
¶ eWastra App
Your driver will use the "eWastra" app to handle all electronic transport documents.
There are several ways your contracting parties can sign a document.
These options will be explained further on.
¶ Driver shows QR-code
As a driver, you can show a QR-code to your consignor.
The consignor can scan this QR-code with the eWastra app and see all document details.
Using the app, he will sign your transport document.
¶ Driver scans signature code
Instead of investing in devices and downloading the eWastra app.
Your consignor can register to the platform and generate a signature code.
Drivers will be able to scan these signature codes at departure.
By scanning this code, the consignor has signed the document.
Click this link to see how your consignor can create a signature code.
¶ Sign in absence of the consignor
If the consignor should not be present, the driver can choose to sign in absence of the consignor.
This might be useful e.g. for night transportation or delivery at locations where nobody is present.
Your consignor didn't sign using the app, but he will still receive all documents on the platform.
¶ Consignor creates the CMR - Loading process
This case is very interesting when a consignor creates transport documents for the driver.
Drivers will not have to be linked before picking up the order.
The consignor can give the document to the driver digitally.
Note that consignor and transport company should be linked.
In the first video we show how a consignor can give a certain document to the driver.
So in the video below, you can see what happens in the app of the consignor.
In the next video, your driver will scan the QR-code from the consignor.
The driver will make a remark and sign the document.
Next, he will let the consignor sing the document.
The consignor in this case will now scan the QR-code from the driver and sign the document.
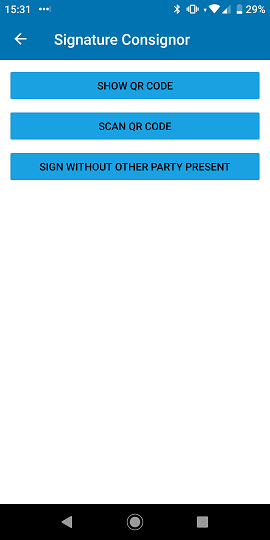
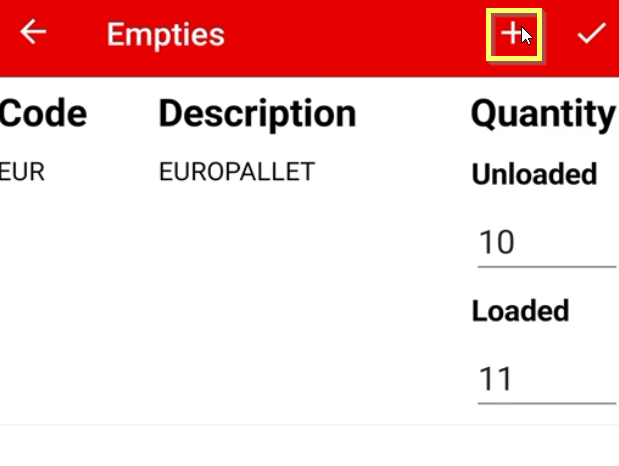
¶ Manage empties in the eWastra App
The driver has the option to register empties when loading and unloading by clicking the empties button in the app.
Contact your administrator to verify the settings are set-up correctly (should be by default).
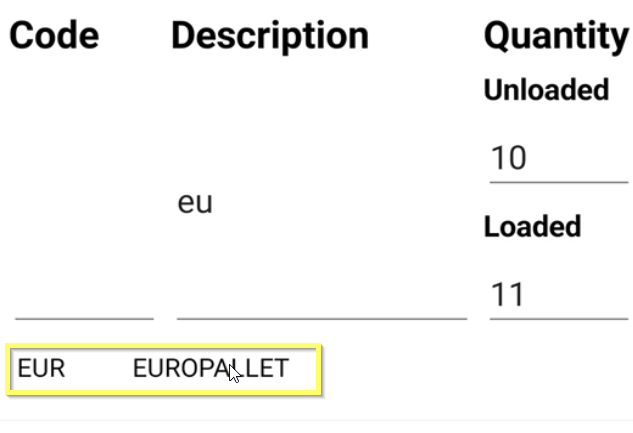
The driver can register empties by:
- Select the desired document
- Click the empties button bottom of the page
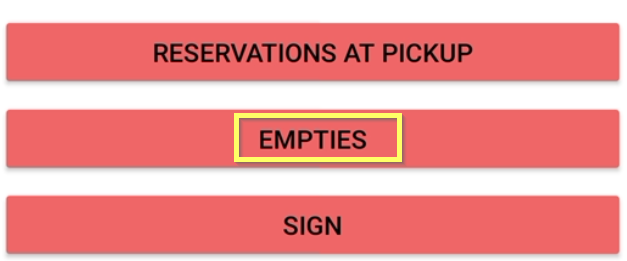
- Fill in the details.
Based on previous registered empties, an autocomplete is shown to help the drivers.
- Save the entry
- If neccessary add another emptie line
- Save the new emptie line and save all empties to return to the overview screen of the document

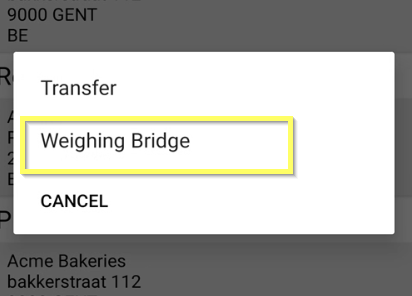
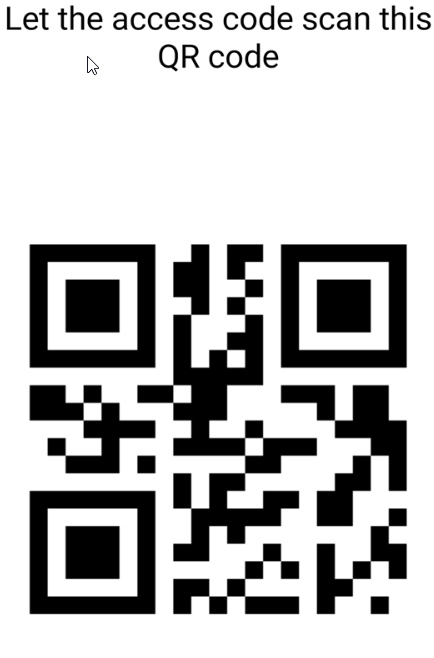
¶ QR acces code template ( weighing bridge integration)
When the driver arrives at location (pick-up/Delivery), the system verfiy's if the configuration is set on the locations account.
Contact your administrator to verfiy the configuration for a specific location
If a configuration is found the driver can generate the QR-code by
- Select the desired document
- Click the three dots in the top right corner of the screen
- Select the desired template (if applicable)
- The QR-code is generated
- Let the weighing bridge scan the QR-code ( data is transfered)
- Close the QR-code and continue loading/unloading procedure

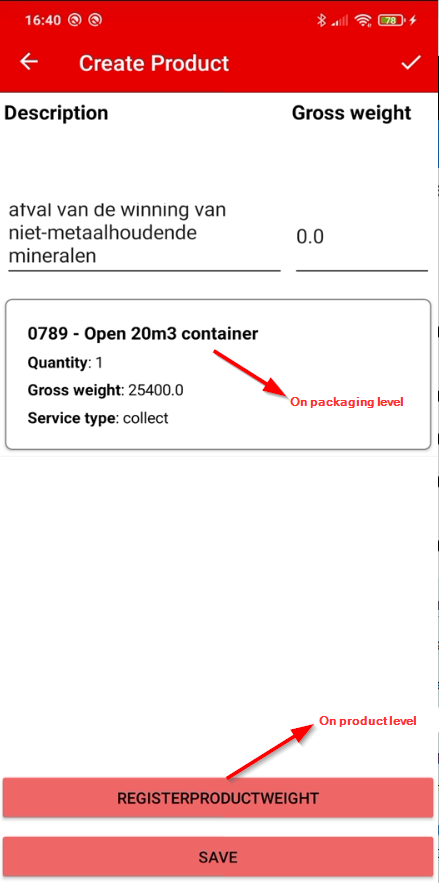
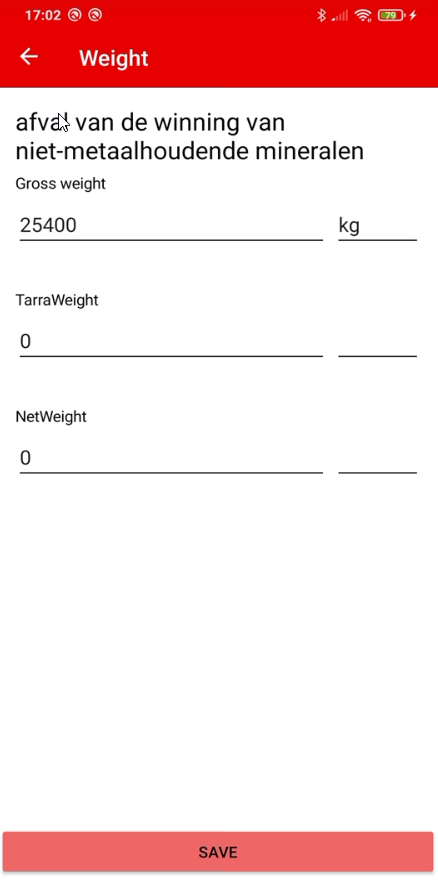
¶ Weight registration
General
The driver has the option to register weights on Product and Packaging level.
Each weight registration can obtain up to 3 different inputs
- Gross Weight
- Tarra Weight
- Net Weight
How to
In order to register weight
- Go to the "edit product" button in the app.
- Select the product for which you would like to add an weight registration.
You will get a screen similar to this.
Both on Product and packaging level you will be able to register 3 different weights: Gross,Tarra & Net weight, each with an corresponding weight unit.
Only a combination of weight and weight unit filled in, will succesfully be saved
Based on when the drivers inputs the weights (pickup vs delivery), the weights will be registered as eather producer weight(Pickup) or weight destinator driver (delivery).
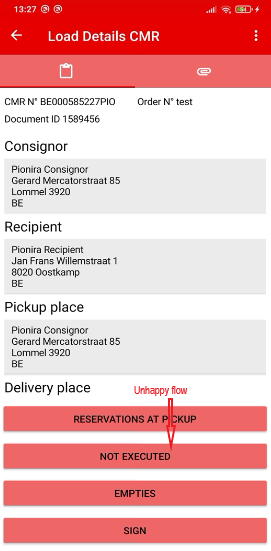
¶ Unhappy flow in the eWastra APP
General
When the loading can't be executed due to various reasons, the 'Unhappy' flow of the transport can be actived by the driver in the eWastra APP. When the driver arrived at the loading location and after selection the button 'Arrived', he can then select the button 'Not executed'. This means that he can't execute the loading and will stop the further handling of the loading/unloading process (also called the 'Happy' flow).
The option 'Enable not executed at pick up flow' can be configured for your organisation. If this configuration is not set for your organisation, the driver will not see the button 'Not executed' and as such will not be able to start the 'Unhappy' flow.
How to
In the eWastra APP
- The driver is shown an extra button 'NOT EXECUTED'.
- The driver has the option to add a reason text for not executing the loading.
- The driver can sign to confirm.
- The driver can optionally let sign the consignor (for cmr) or the producer (for digid)
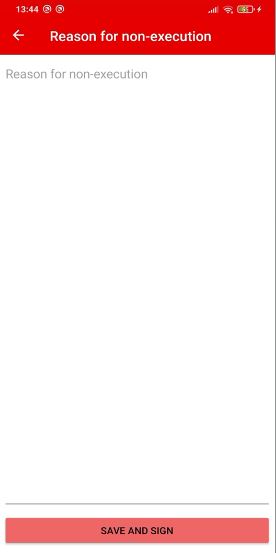
On the report(s)
- On the report(s) (e-Cmr and/or IDF document) the reason of non-execution is shown
Statusses
- The document status is set to 'cancelled'
- The order status is set to 'notExecutedAtPickUp'
¶ Signing as the Producer and Collector in the 'Happy flow' of the eWastra APP for a Digid document
General
** Documentation page under construction **
This paragraph descibes how to collect the mandatory signature from a collector and/or the optional signature from the producer, when a DIGID was created that involves a value for the 'Collector' object (IHM'r).
How to
How to active this setting in eWastra?
If your organisation wants to activate this setting, go to the admin panel of your organisation, select settings, navigate to 'Devices' and the 'Signatures part', and select/deselect the option 'Enable signing as producer and collector'.
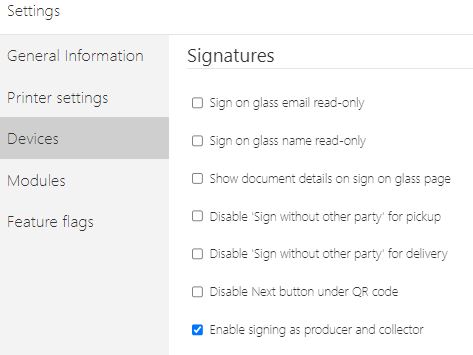
By default, this checkbox will not be enabled.
This setting will impact the signature flow in the eWastra APP, once the driver has signed for loading.
The 'Producer' and/or 'Collector' will be able to sign at loading when this option is enabled.
Scenario's when setting is enabled :
- No Collector attributed to the transport document: At loading, the carrier and producer must sign
- Producer is different from the Collector : At loading, the carrier and collector must sign. Signature for the producer is optional.
- Producer is equal to the Collector : At loading, the carrier and producer must sign.